Sunday, March 17, 2013

Einstein, relativity, and ArcMap

The theory:

Einstein's theory of relativity has something to do with ArcMap... at least in the abstract. The theory states that measurements of various quantities are relative to the velocities of observers. And something about time being 'warped'.

Think of the world in this image as your map document and think of the warped grid as your network path --your 'Space'.

The problem:

Let's say your IT group installs a new disk in your network which is thankfully larger, making your work easier. They even moved your project data to this new drive. So let's say all your data and map documents are moved from the D:\Projects to the F:\Projects. Cool!

Well, not so cool, if you haven't prepared your work for this! In fact, this process may have been more like the "Big Bang"!

Every one of your layers now has than dang red exclamation mark, which we all know means the Source Property is broken.

Most of you already know the way to fix the red exclamation, but hey, why not make it so this doesn't happen in the first place? All you have to do is establish Einstein's Theory of Relativity before hand. (I know, I'm getting way too corny... but hey, I'm from Kansas!)

The fix: Relativity

Do this BEFORE the IT move. In ArcMap, open File > Map Document Properties...
Towards the bottom, check "Store relative pathnames to data sources".


That's it! Now when IT moves your Projects directory (which contains both your data and your map documents) from one drive to another, everything still works!

Using relative paths doesn't mean that the layers in your document will never need repairing. Even with relative paths, it is still possible for a document to be unable to find its data sources if the document or the data sources are moved to a different location relative to each other, such as to a different part of the folder hierarchy or to a different disk.

Read up in the help documentation for a few more details about relative pathnames as I didn't cover everything here. 

Recommendation:

BTW, you can set this as a default for every map document. In ArcMap, choose Customize > ArcMap Options. Check the Make relative paths the default for new map documents.


The confession:

I have no idea why I even connected this idea to Einstein's theory or the Big Bang... it just sounded like fun.

Happy GISing!

Friday, March 15, 2013

Reattaching a beheaded layer's heading!

A layer's heading -- NAME in this example.


You can behead it by clicking on the heading twice (no double-click). 

Then clicking the delete key. Click somewhere else in your table of contents and you get this:

What happens if you want it back? (I saw this posted on a list serve and thought this is a good tip to post on my blog.) It's quite easy, but sorta hidden.

Open the Symbology properties for the layer. 

Select (highlight) all the symbols you want to 'head'. Right click and choose  Move to Heading > New Heading...

Enter your new header name, NAME, shown below. 

Click OK. With the result, you now have your heading back. 

And it shows in your table of contents when you save the changes.

Remember, you can change the heading to anything you want either in the Properties or in the table of contents. 


You can also create a heading for groups of symbols. Give that a try! Have fun!

Monday, February 18, 2013

Getting rid of donut holes

I recently had a student ask about getting rid of small holes in her data. She had created a polygon feature class from a raster analysis. Some of you may have seen this happen when working with classified data or sliced data. Or, you may have other donuts made by lakes, river corridors, rights-of-ways, etc.

There are at least two ways to attack this challenge.

Method 1: If you have many (hundreds or thousands), you may want to try the Eliminate Polygon Part tool (which is only available with Advanced ArcGIS). I ran a number of tests and wasn't fully satisfied by the AREA condition of the tool, but I did like the PERCENT option. Let's look at that.

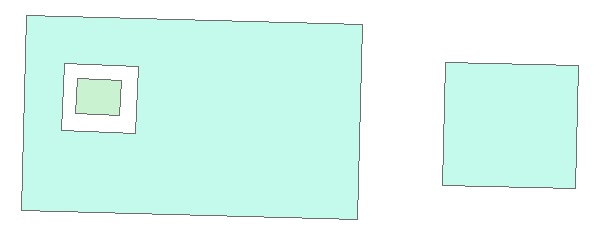
Here's my test data:
The big box with it's smaller square on the left is one multi-part polygon. The box on the right is another polygon.
Here's how I applied the tool:


Notice how I am overwriting the output (since I tested this a bunch) and that I'm using the Optional Condition PERCENT set at 5%. The result:


Here's some other results from just changing the percent amount to 6% and 8%. 


The optional condition of AREA never worked no matter what size I set it at. Is it a bug? I'm not sure. More testing is necessary. Anyone out there had success with AREA?

Method 2: If you have a few to do, you can perform this with an edit. Starting with the same test data, you can do this.

Step 1: Start editing
Step 2: Double-click the donut feature (not the hole). 
Your cursor now turns white outlined in black.

Step 3: Point at the edge of the hole you wish to delete, right-click and choose Part > Delete.

Result is below:
So there you are... Experiment and have fun!


Thursday, February 7, 2013

ArcGIS Dissolve challenge

Ragnvald Larsen has a solution to dissolve hanging when there are a lot of features. Additionally, he proposes there is a threshold for efficiency when running Dissolve. Take a look at his article. Solving the ESRI arcpy dissolve challenge

Note that his solution would work outside of Python. For instance, you may use ModelBuilder to construct this logical model.

I suspect, though, if he were to covert the shapefile to a file geodatabase, the results would be different. When you have 'big', shapefiles tend to not work well.

I've just received a great explanation of a possible cause for this and a solution that could shed some light on this. It's from Charles Convis of ESRI. I've highlighted some statements that I think are valuable. Thank you, Charles.


Hi, I'm working with datasets in the many millions of features with lots of vector processes including dissolves.  A possible source of your problem is "godzilla polygons", ie single polygons with a large number of vertices.  I would suspect this is very likely with the norwegian coastline. Godzillas will often hang and crash without informative errors. Godzillas are also common when working with data from different scales, and data that was originally hand-digitized by someone who didn't know the difference between streaming and point modes. i.e. they are more common than you think.
Here is a systematic way to deal with them:

1. Add a vertexcount field to your attribute table and calc it to !shape!.pointcount, as in:
arcpy.AddField_management(gpoly, "VERTEXCOUNT", "LONG") arcpy.CalculateField_management(gpoly, "VERTEXCOUNT", "!shape.pointcount!", "PYTHON", "")

2. open up your attribute table and sort descending on VERTEXCOUNT to get a quick summary look at your possible godzilla polygons.  Depending upon your hardware, anything over 10,000 vertices can cause problems.  Geodatabases on a higher end machine can handle 50,000 for most processes.

3. You get rid of vertices with the dice command, using the limit you determine from the exercise above and some old fashioned trial and error on your machine, as in:
arcpy.Dice_management(gpoly, gpolydice, 50000)
  Dice is analagous to the script you wrote, but rather than lowering feature counts by splitting files
it cuts large polygons up so they'll behave.   (If your script split up your files along abritrary boundaries
you would have been achieving the same effect of cutting up large polygons at the same time as you were lowering your feature counts in each file.)

4. Now your polygons should be much more amenable to all of the rest of your processes. Also you are more likely to be able to successfully run any of the other more standard polygon simplify commands that thin or generalize your linework so as to have fewer vertices.

5. In the end, a simple dissolve will get rid of your dice lines, but it's worth re-calculating your vertexcount just to make sure you didn't inadvertently create godzillas with your dissolve operations.  Godzillas are a common side-effect of dissolves.

general tips for handling problems and crashes:

6. If possible move to a file geodatabase, stability and capability is orders of magnitude greater
      than shapefiles.  7,000 polygons may stress a shapefile, but it won't make a geodatabase
      even break a sweat. I run geodatabases with 5 million features on an average PC often.

7. If possible, fire up task manager and watch your processes while they are runing. %cpu use is less informative than physical memory useage. A normal process will run along at, say, 50% ram useage with plenty of fluctuations up and down, sometimes strong fluctuations. That's normal.
The behavior of a runaway process is often to ramp up linearly and steadily with no fluctuations.
If it hits 100% and stays there you likely have a crash.   Try watching it sometime when it's
running a job you are having problems with and you may find other early warning signs.

8. As I've said several times before, problems with ArcGIS processing can more often be traced to these kinds of data issues than to faults in the software.  Sure there are bugs, but in my experience problems in the datasets themselves are a lot more common.  Also, as a general
observation,  software issues seem to me to manifest as soon as I enter the command.   Data
issues I uncover tend to show up later on during processing.

regards,
Charles Convis
Esri Conservation Program

Thursday, January 24, 2013

Controlling the "Digitizer Wiggle" and other editing options

Controlling The Digitizer Wiggle

Have you ever smudged your data when you selected a feature during editing that results in this?
I call this "The Digitizer Wiggle" -- something done accidently. The result may be just a few feet on the ground, but it really messes up your data and makes your work very sloppy. ADDITIONALLY, getting back to normal is a pain. So the important thing here is to control this so you don't do it in the first place! It's very easy to do.

When you don't need detailed feature editing (like when you are selecting features to edit the attributes and not the location), then all you have to do is go to Editor > Options (on the Editor toolbar) and set the Sticky Move Tolerance under the General tab.


The default Sticky Move Tolerance is 0 pixels. This mean you only have to move the feature 1 pixel (actually anything greater than 1/2 pixel) on your screen to complete the move. It is very difficult to see that small movement on your screen and very easy to do. For most anyone, I suggest that you set this to 3 pixels as shown above. 

How much is 3 pixels on the ground? Display scale and the resolution of your screen have to be factored in to figure this out. It really doesn't matter for attribute editing. When you want to do detail work, then set this to 0, but be careful! Remember, that fixing errors is a lot harder than not making them in the first place.  

So go ahead and experiment with this next time you're editing features. And by the way, look at some of the other options that are available!

Are there other examples of "The Digitizer Wiggle" (TDW)? Sure. I lump all shaky-hand and tentative editing into TDW. Editing skillfully takes lots of practice, knowledge (of many options), focus, interest and patience. It's not for everyone.

Some Editing Options

Do you know about the ArcMap Advanced Settings Utility? It's great, and I've had to use this a few times. Actually the Sticky Move Tolerance used to be included here, but esri moved into a more accessible area. So what is this ArcMap Advanced Settings Utility? Well, it controls all sorts of registry settings and any skilled user should know about it. You will find it located in:
c:\Program Files\ArcGIS\Desktop10.1\Utilities (at least on your pc) and named AdvancedArcMapSettings.exe.

Simply double-click to start it and take a look at all the options you can control! 


Most of these I've had no interest in at all. There is one, though, that students have asked me about frequently. This is how to control the mouse wheel and the action it performs. Click the Miscellaneous tab and note you can either scroll up/down with the mouse or zoom in/out. The scroll up/down used to be the default setting for early versions of ArcGIS Desktop.


Again, I urge you to explore the options and see if there's anything of interest. For instance, take a look at the Symbols/Graphics tab. 

Change Mouse Wheel Zoom Action From out/in to in/out

I've had a number of CAD users ask me how to control the out/in when zooming because they are used to in/out wheel control. Well, you find that in another menu! In ArcMap, go to Customize > ArcMap Options... (on the Main Menu), click the General tab and look towards the bottom. Viola!


As always when doing something like this, take the opportunity to explore other options. 

So have fun with some QDT today and keep an eye out for more of my blogs. (Many of my students know this term -- Quality Dink Time -- and if you're talking to your manager, call it Quality Development Time!!!)

Sunday, January 13, 2013

Evaluation of two ArcGIS utility tools: MXD Doctor and Document Defragmenter


There are utilities provided by esri that run outside of ArcMap and ArcCatalog that many users don’t ever see or know to look for them. I’m covering two of them today. I will add more at a later time. Certainly, check out the documentation on these utilities for more detailed information.

When did these arrive? I don’t know! All I know is that they’re there now. So let’s look at these utilities.


MXD Doctor

Find it at All Programs > ArcGIS > Desktop Tools. This stand-alone utility analyzes broken .mxd files. I’m not sure what ‘breaks’ them, but I do know they do get funky and just not run from time to time. I remember some in the past that I actually had to throw away – and now I wish I knew about this tool. I don’t presently have a broken map document, but I’ve run one through the tool.

First thing I noted about running this tool is that is boldly suggests right at the beginning to back up your map document. Hmmm, could this be that it might just destroy your map document? Well, it doesn’t matter because you’re probably grasping at straws trying to fix even a portion of your very valuable map document.

MXD Doctor analyzes: Maps and data frames; Page layout; VBA project; Style gallery; and Thumbnail preview.

Since I didn’t have a broken map document at the moment, I ran a good map document through the tool. It’s a very simple map document I was demoing for a class I was teaching. 

Interesting… after I analyzed my document as per the instructions, it said I had a problem with my Maps. There’s nothing wrong with my Maps. Everything was fine to start with!


I continued boldly on, following the instructions and ‘fixed’ the document. This took quite a while for my small map document, so I would suspect if you had a complex one it would take a long while.

The result creates a new map document (if it completes successfully) by creating it in the same location as your broken map document and appending  ‘_new’ to the name. Pretty nice there.
I opened up the new map document and all is there! Again, since I didn’t have a broken map document to test this on, I can’t vouch for its effectiveness. So if any of you out there have experience with this tool, please add to the blog!

My evaluation:
It ran as advertized, but since I didn’t have a broken map document, I can’t say for sure if it's helpful. BUT, I'd sure give it a try if I had a corrupted complex map document!

What I would change:
I would investigate why it’s throwing the red checkmark (saying my map was recoverable, although not completely) when there’s nothing wrong with the map document. This creates a lot of suspicion in my mind.

ArcGIS Document Defragmenter

Find it at All Programs > ArcGIS > Desktop Tools. This stand-alone utility defragments the storage inside an .mxd file to potentially reduce the file size. (I’m not sure how this actually differs from the normal defragging tools for your OS.) But, I gave it a run at one of my demo map documents that I’ve actually worked with quite a bit.


This utility does not warn you upon startup to copy your map document, but the documentation does. So you copy your map document (increasing storage on your computer, and possibly fragmenting your disk further). You can run this on a single file, a folder, or a folder and it’s subdirectories! Cool! Notice that it offers you some options for the file handling options. A nice thought there. I chose the options shown above.

Since my map document was small, I expected it to run fast, but hey! I never got a message that it was complete. A small ding against the tool there. So I inspected my map document file and saw that it was exactly the same size. Hmmmm. I can’t imaging my file had no fragments. Did my OS already clean that up?

My evaluation:
It basically ran as advertised  but it didn’t seem to do anything to my document. Not sure this would do anything more than my MS operating system already does.

What I would change:
Create a message that informs completion. Just a simple message perhaps overwriting the Defragmenting statement with Complete. 

It could also evaluate your input for how much fragmentation (similar to other defraggers I've worked with). This way you have a notion how badly your files are to start with.

Wednesday, January 2, 2013

Recover your lost toolbar

ArcMap and ArcCatalog remember where you place toolbars so the next time you start the application they are in the same location. This is a great capability until things go wrong.

If you use dual screens then switch your machine to a single screen, you may have 'lost' a toolbar or two. This fix is easy but is a wholesale change and affects all toolbar placements.

ArcMap and ArcCatalog remember these settings in 'Normal' files. On a windows os, they are stored in:

C:\Users\<username>\AppData\Roaming\ESRI\Desktop10.1\ArcCatalog\Normal.gxt
and
C:\Users\<username>\AppData\Roaming\ESRI\Desktop10.1\ArcMap\Templates\Normal.mxt

If you've lost a toolbar off-screen, follow these steps:

1) Close ArcMap and/or ArcCatalog (whichever one is causing the problem).
2) Navigate to the directory listed above.
3) Rename the Normal file to 'OldNormal'. (You should keep the old one just in case!)
4) Restart your application.

This creates a new 'Normal' from esri's install and places all toolbars in default position. Unfortunately, this procedure affects all toolbars which may cause you a bunch of work replacing them to your preferred positions. BUT, if you really needed the one off-screen, then this does the job.

I remember from way back there were other methods for toolbar recovery. If anyone wants to add their method, go ahead. I'll add to the list as time goes on.

Take care all!